
10 Automatic Drip Irrigation Tips for Global Buyers?
For global buyers, selecting automatic drip irrigation is not simply a matter of choosing tubing and emitters. Water quality, crop spacing, soil texture, climate, and available pressure all affect performance. A setup that works in sandy soil may leave dry patches in heavier ground. And a low-cost filter can become a costly weak point when source water carries sediment.
Irrigation researcher Dr. Michael Dukes studies irrigation management and scheduling. A concise paraphrase of the practical principle behind this field is: “Let measured crop and soil needs—not habit—guide watering.” This is a paraphrase, not a verified verbatim quotation. It captures an important buying lesson: match system capacity and control options to real growing conditions. Check filtration, pressure regulation, emitter flow, connector compatibility, and replacement-part access before comparing prices.
Details matter. A pressure gauge, a clean filter screen, and a flushed line can prevent uneven delivery. Small checks. Big difference. The ten tips ahead will help buyers compare specifications, ask suppliers sharper questions, and plan installation with maintenance in mind. They also flag trade-offs worth reviewing, including automation features that may add complexity without solving a site’s main irrigation problem. No single kit suits every farm or garden. Careful matching is the better starting point.
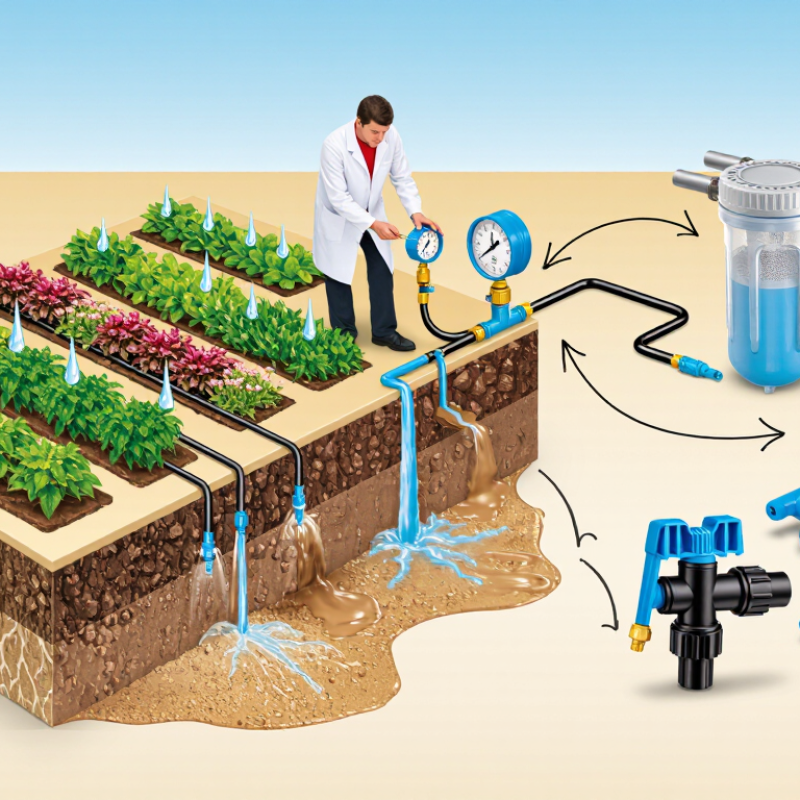
Understanding Automatic Drip Irrigation Systems and Their Benefits
Automatic drip irrigation delivers water slowly through emitters placed near plant roots. It can reduce evaporation, limit leaf wetness, and improve water control in greenhouses, gardens, and field crops. A reliable system needs more than tubing and a timer. Water quality, pressure, climate, and crop spacing all affect performance. No design is perfect.
Tips: Check the water source before buying components. Use filtration when sediment is visible. Add a pressure regulator for stable flow. Match emitter rates with soil absorption. Keep lines short when pressure varies. Flush the pipes regularly. Install valves for separate crop zones. Protect filters from freezing weather. Test moisture below the surface. Keep spare connectors available. Small details matter.
Global buyers should request clear flow data, material specifications, and installation guidance. Components must suit local temperatures and water conditions. For example, hard water may gradually block narrow emitters. Salty water can also affect soil health. I have found that testing one small section reveals problems earlier than installing a full network. Measure twice. Adjust slowly. A timer may save labor, but it cannot replace field observation. Check wetting patterns after windy days and heavy rain. Some systems look efficient on paper, yet perform unevenly in real soil. Regular inspection builds reliability and protects both crops and operating costs.
10 Automatic Drip Irrigation Tips for Global Buyers? - Understanding Automatic Drip Irrigation Systems and Their Benefits
| # | Buying Tip | Practical Guidance | Potential Benefit | What to Check |
|---|---|---|---|---|
| 1 | Match the system to the water source | Confirm the available flow, pressure, water quality, and supply schedule before selecting components. | Helps avoid undersized or incompatible system designs. | Ask for the system’s required operating range and flow calculations. |
| 2 | Choose filtration for the water and emitters | Drip emitters have small water passages. Select a filter type and rating that follow the emitter manufacturer’s specifications and suit the water source. | Reduces the risk of clogging and uneven delivery. | Check filter capacity, cleaning method, and replacement availability. |
| 3 | Verify pressure compatibility | Operating pressure depends on the tubing, emitters, valves, and layout. Use pressure regulation where needed and follow component specifications. | Supports more consistent emitter performance and helps protect components. | Request pressure ratings for each component, not just the controller. |
| 4 | Plan emitter flow and spacing around the crop | Emitter flow and spacing should reflect crop water needs, plant spacing, soil texture, and the size of the wetted area. Avoid assuming one layout suits every field. | Promotes suitable root-zone wetting and helps limit dry or overwatered areas. | Ask for a layout recommendation based on crop, soil, and row dimensions. |
| 5 | Size pipes and zones carefully | Divide large or varied planting areas into zones when needed. Pipe diameter and zone size affect flow and pressure across the system. | Can improve distribution uniformity and make scheduling more flexible. | Request a hydraulic design showing flow and pressure at each zone. |
| 6 | Check automation and power requirements | Select a timer or controller that supports the number of zones and the available power source. Battery, mains, and solar-powered options may suit different sites. | Makes scheduled watering more practical in different operating conditions. | Confirm voltage, battery type, weather resistance, and backup settings. |
| 7 | Consider sensors and local conditions | Soil-moisture or rain sensors can inform watering schedules, but sensor placement and calibration should suit the site and crop. | Can help adjust irrigation to changing weather or soil moisture. | Check sensor compatibility, installation guidance, and local availability. |
| 8 | Plan for flushing and routine maintenance | Provide accessible line ends and follow a regular inspection and flushing schedule appropriate to the water quality and system design. | Helps remove accumulated sediment and supports dependable operation. | Check for flush valves, service instructions, and readily available spare parts. |
| 9 | Assess materials for the installation environment | Consider UV exposure, temperature variation, chemical compatibility, and whether lines will be above or below ground. | Helps ensure selected materials suit the expected conditions and service life. | Request material specifications and installation limits for the intended site. |
| 10 | Confirm documentation and local requirements | For international procurement, verify applicable import rules, electrical requirements for controllers, language needs, and access to technical support. | Can reduce installation delays and simplify operation after delivery. | Check manuals, conformity documents where applicable, warranty terms, and spare-part lead times. |
Related Posts
-
10 DIY Drip Irrigation Tips for Global Buyers?
-
How to Choose Drip Tube Irrigation Suppliers Worldwide?
-
2026 Best Garden Drip Irrigation Systems for Global Buyers?
-
Who Are the Top Garden Drip Irrigation Suppliers in China?
-
What Are the 2026 Top Garden Drip Irrigation Systems?
-
2026 Top Trends in Dig Drip Irrigation Techniques?