
How to Choose the Best Drip Line Irrigation System?
Choosing the best drip line irrigation system is not simply a matter of buying the thickest tubing. Crop spacing, soil texture, water quality, pressure, and field slope all influence performance. A system that works well in sandy soil may waste water in heavy clay. Small design errors can create large dry zones.
The United Nations World Water Development Report identifies agriculture as responsible for roughly 70% of global freshwater withdrawals. That figure explains why efficient irrigation deserves careful planning. The U.S. Department of Agriculture also reports that drip systems can achieve very high application efficiency when properly designed and maintained. However, efficiency is not automatic. Clogged emitters, uneven pressure, poor filtration, and careless flushing can quickly reduce real-world results.
Irrigation specialist Dr. R. K. Sivanappan stated, “Drip irrigation is the most efficient method of irrigation.” His observation remains useful, but it needs context. Efficiency depends on correct emitter spacing, flow rate, operating pressure, and regular inspection. The best drip line irrigation choice should therefore match the crop’s root zone, not merely the product label. Consider pressure-compensating emitters for uneven fields. Use stronger tubing where machinery may cross the rows. Check water analysis before selecting filters and injection equipment.
Some recommendations remain uncertain.
This guide compares the practical factors behind a reliable system, including lifespan, maintenance, installation cost, and water delivery uniformity. It also considers lessons from field use, where dust, algae, rodents, and inconsistent pressure often matter more than advertised specifications. References include the UN World Water Development Report, USDA irrigation guidance, and published irrigation research.
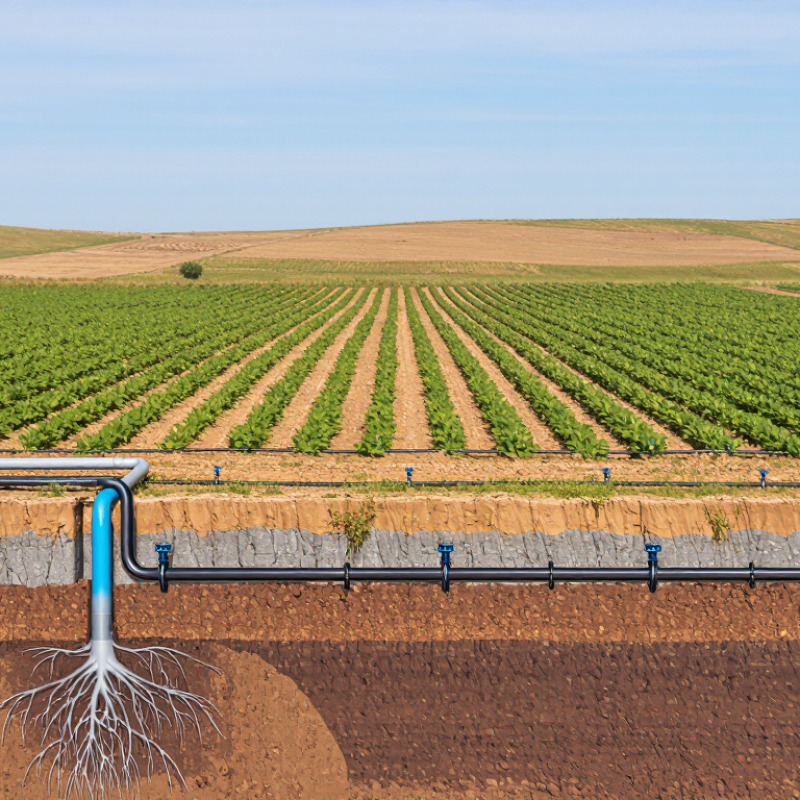
Assess Your Landscape, Crops, and Irrigation Requirements
How to Choose the Best Drip Line Irrigation System?
Assessing your landscape is the practical starting point. Walk the site after watering and observe dry patches, runoff, and standing water. Slopes need pressure-compensating emitters or shorter irrigation zones. Flat beds may use regular emitters with simpler spacing. Measure water pressure at the source, not from a household estimate. Low pressure can leave plants stressed at the far end.
Match the drip line to your crops and soil. Tomatoes, peppers, and young fruit trees usually need different flow rates. Sandy soil requires closer emitter spacing because water moves downward quickly. Clay soil spreads moisture slowly and may need longer pauses between cycles. Dig below the surface after irrigation. The top layer can look wet while roots remain dry. A small soil probe helps reveal this.
Water quality also matters. Fine sediment can clog emitters, so filtration and occasional flushing are essential. Test flow from several points along the line. Uneven output often signals pressure loss, blocked outlets, or excessive zone length. Keep records during hot and cool weeks. I still recheck layouts after the first harvest because root growth changes moisture needs. No design stays perfect. A timer should support observation, not replace it.
| Landscape or Crop Type | Typical Planting Pattern | Recommended Drip Line Layout | Suggested Emitter Spacing | Typical Emitter Flow Rate | Common Operating Pressure | Filtration Guidance | Approximate Seasonal Water Requirement | Key Selection Considerations |
|---|---|---|---|---|---|---|---|---|
| Annual vegetables and row crops | Rows spaced approximately 30–90 cm apart | One drip line per crop row; use two lines for wide beds or densely planted crops | 20–30 cm | 0.8–1.6 L/h per emitter | 0.7–1.0 bar | 120 mesh or finer for most clean water supplies; follow the line manufacturer’s requirement | Approximately 10–25 mm of water per week during active growth, depending on climate and crop | Choose pressure-compensating emitters on sloped ground or where long runs may create uneven flow. Use closer spacing in sandy soil. |
| Raised beds and compact garden plots | Multiple short beds with concentrated planting | Install one or more parallel lines across each bed; place lines near the plant root zone | 15–30 cm | 0.8–1.6 L/h per emitter | 0.7–1.0 bar | 120 mesh recommended, plus a flush valve at the end of each zone | Approximately 10–25 mm per week during warm, dry conditions | Shorter zones simplify flow balancing. Select flexible tubing if beds are frequently replanted or rearranged. |
| Orchards and mature fruit trees | Trees commonly spaced 3–8 m apart in rows | Use one line for young trees and one or two lines per tree row as canopies and root zones expand | 30–60 cm | 1.6–4.0 L/h per emitter | 1.0–1.5 bar | 80–120 mesh, depending on emitter passage size and water quality | Approximately 20–45 mm per week during peak water demand | Expand the wetted area as trees mature. Avoid placing all emitters directly against the trunk; distribute water beneath the canopy. |
| Shrubs, hedges, and perennial borders | Plants spaced approximately 30–120 cm apart | One continuous line along a hedge or one to two loops around larger shrubs | 30–60 cm | 1.0–2.3 L/h per emitter | 0.7–1.2 bar | 120 mesh for reliable performance and reduced clogging risk | Approximately 10–30 mm per week, adjusted for plant maturity and rainfall | Use pressure-compensating line where planting beds vary in elevation. Keep the line under mulch but accessible for inspection. |
| Greenhouse crops and nursery containers | Closely spaced plants in rows, benches, or containers | Use one line per row or individual takeoff emitters for containers with different water needs | 15–30 cm for beds; individual emitters for containers | 0.5–2.0 L/h per outlet | 0.7–1.0 bar | 120 mesh or finer; include a reliable flush point and backflow protection where required | Approximately 5–20 mm per week, with more frequent short irrigation cycles | Uniformity and precise scheduling are critical. Separate plants with substantially different container sizes into different zones. |
| Sandy or fast-draining soil | Any crop or landscape with rapid infiltration and limited water storage | Use additional lines or closer lateral spacing to distribute water across the root zone | 15–30 cm | 0.8–1.6 L/h per emitter | 0.7–1.0 bar | 120 mesh or finer, with regular flushing and filtration maintenance | Often 15–35 mm per week, divided into shorter and more frequent cycles | Closer spacing reduces dry pockets. Avoid applying water so quickly that it moves below the active root zone. |
| Loam soil and mixed residential landscapes | Mixed shrubs, perennials, vegetables, and small trees | Use separate zones for plants with different exposure, rooting depth, or water demand | 30–45 cm for most beds | 1.0–2.3 L/h per emitter | 0.7–1.2 bar | 120 mesh is a practical starting point for typical filtered water | Approximately 10–25 mm per week, adjusted for weather and rainfall | Loam generally provides balanced drainage and water storage. Group plants by similar irrigation needs rather than by appearance alone. |
| Heavy clay soil or compacted ground | Landscapes with slow infiltration and limited surface drainage | Use wider spacing and low application rates; install lines on or just below the mulch layer | 30–60 cm | 0.8–1.6 L/h per emitter | 0.7–1.0 bar | 120 mesh or finer, with flush outlets at line ends | Often 10–20 mm per week, applied in slow cycles to prevent runoff | Shorten irrigation cycles and allow time for infiltration. Check for ponding before increasing run time. |
| Sloped beds and irregular terrain | Planting areas with noticeable elevation changes | Run laterals across the slope where practical; divide long runs into shorter zones | 30–45 cm | Pressure-compensating emitters, typically 1.0–2.3 L/h | 1.0–1.5 bar | 120 mesh, pressure regulation, and accessible flush points | Approximately 10–30 mm per week, depending on plant type and exposure | Pressure-compensating line improves uniformity. Include air-release valves at high points and prevent drainage at low points where necessary. |
Related Posts
-
2026 Best Drip Tube Irrigation Systems for Global Buyers?
-
2026 Best Drip Line Irrigation Systems for Efficient Water Usage?
-
Top Landscape Drip Irrigation Systems for Global Buyers?
-
Top Benefits of Drip Irrigation for Global Farmers?
-
What are the Benefits of Drip Tube Irrigation for Farmers?
-
Best Drip Line Irrigation Systems for Efficient Watering?